- Physical Examination
- Surgical Examination
- Ophthalmology
- Clinical Skills
- Orthopedics
- Surgery Videos
- Laparoscopy
- Pediatrics
- Funny Videos
- Cardiothoracic Surgery
- Nursing Videos
- Plastic Surgery
- Otorhinolaryngology
- Histology and Histopathology
- Neurosurgery
- Dermatology
- Pediatric Surgery
- Urology
- Dentistry
- Oncology and Cancers
- Anatomy Videos
- Health and Fitness
- Radiology
- Anaesthesia
- Physical Therapy
- Pharmacology
- Interventional Radiology
- Cardiology
- Endocrinology
- Gynecology
- Emergency Medicine
- Psychiatry and Psychology
- Childbirth Videos
- General Medical Videos
- Nephrology
- Physiology
- Diet and Food Health
- Diabetes Mellitus
- Neurology
- Women Health
- Osteoporosis
- Gastroenterology
- Pulmonology
- Hematology
- Rheumatology
- Toxicology
- Nuclear Medicine
- Infectious Diseases
- Vascular Disease
- Reproductive Health
- Burns and Wound Healing
- Other
Top videos
What is systemic lupus erythematosus? The immune system normally fights off dangerous infections and bacteria to keep the body healthy. An autoimmune disease occurs when the immune system attacks the body because it confuses it for something foreign. There are many autoimmune diseases, including systemic lupus erythematosus (SLE). The term lupus has been used to identify a number of immune diseases that have similar clinical presentations and laboratory features, but SLE is the most common type of lupus. People are often referring to SLE when they say lupus.

A brief description of the mechanisms, types and assessment of chromosomal analyses. Techniques such as standard cytogenetic testing, FISH and array methods are discussed. Indications for testing in prenatal, neonatal and adult periods are also discussed. Deletions, translocations, inversions etc are described, as are mosaicism and aneuploidy.
Urinary incontinence is the unintentional loss of urine. Stress incontinence happens when physical movement or activity — such as coughing, sneezing, running or heavy lifting — puts pressure (stress) on your bladder. Stress incontinence is not related to psychological stress. Stress incontinence differs from urge incontinence, which is the unintentional loss of urine caused by the bladder muscle contracting, usually associated with a sense of urgency. Stress incontinence is much more common in women than men. If you have stress incontinence, you may feel embarrassed, isolate yourself, or limit your work and social life, especially exercise and leisure activities. With treatment, you'll likely be able to manage stress incontinence and improve your overall well-being.

Watch that video to know more about the World's First Head Transplant Surgery
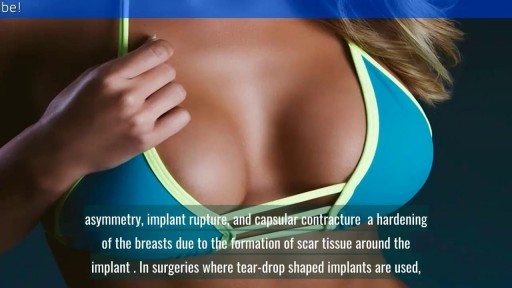
reast Augmentation: From Cost to Complications || Common gynaecological problems in women Breast augmentation (aka augmentation mammaplasty) is one of the most popular cosmetic procedures performed in the U.S. today. Despite controversy over the use of silicone breast implants, women have shown a continuing and growing eagerness to surgically enhance the size and shape of their breasts. If you are a healthy, non-smoking women who are at or near their ideal weight, with enough of their own breast tissue to cover and support an implant adequately, then you are a good candidate for breast augmentation surgery.

I talk about 5 Essential Skills you need as a nurse. These skills are timeless in the fat that you will always need to use them at some level. Of course specific skills are good to have as well but these skills are universal and can help you in other areas of life as well.
NURSING SCHOOL STUDY RESOURCES: https://sellfy.com/nursingschoolstudyNURSING
PHARMACOLOGY: https://sellfy.com/p/fnoy/
INSTAGRAM:https://www.instagram.com/your_mentor_rn/?hl=en
PERSONAL INSTAGRAM: https://www.instagram.com/crosby_steen/
MEDIUM ARTICLES: https://medium.com/@rnacademy1..../7-tips-for-nursing-
AMAZON PRIME STUDENT DISCOUNT: https://amzn.to/2OIleAe
VIDEO GEAR
Camera: G7X Markii - https://amzn.to/2na3OR8
Phone: Galaxy Note 8- https://amzn.to/2nboHM3
Audio: Zoom H4NPro Audio Recorder- https://amzn.to/2vktlf8
Computer: 13 inch Macbook Pro- https://amzn.to/2ndhISw
INSTAGRAM TV https://www.instagram.com/crosby_steen/
Hi Guys! My name is Crosby Steen. I am a Nursing Educator, and ER Travel Nurse. I do videos on daily science based news and travel, with the goal of providing value for you in science based education and travel nursing. Any questions hit me up in the comments or Email below.....
PRIVATE TUTORING OR VIDEO REQUESTS CONTACT:
crosby.steen@gmail.com
MUSIC BY: https://andrewapplepie.com/ and copyrighted by Epidemic Sound
Music by Joakim Karud http://youtube.com/joakimkarud
Music by DJ Quads

Dr. Fizan Abdullah is head of the Division of Pediatric Surgery and vice chair of the Department of Surgery at Ann & Robert H. Lurie Children's Hospital of Chicago. His special interests include Chest wall deformities, pectus excavatum, abdominal wall defects, neonatal surgery, pulmonary and upper airway malformations, congenital diaphragmatic hernia, esophageal and gastrointestinal anomalies, hernia repair, tissue engineering, extracorporeal membrane oxygenation (ECMO), surgical safety protocols and surgical infections.
Learn more at www.luriechildrens.org

Today on Crash Course Anatomy & Physiology, Hank breaks down the parts and functions of one of your body's unsung heroes: your epithelial tissue.
Pssst... we made flashcards to help you review the content in this episode! Find them on the free Crash Course App!
Download it here for Apple Devices: https://apple.co/3d4eyZo
Download it here for Android Devices: https://bit.ly/2SrDulJ
Chapters:
Introduction 00:00
Proper Epithelium & Glandular Epithelium 1:38
We're All Just Tubes! 2:12
Cell Shapes: Squamous, Cuboidal, or Columnar 3:34
How Form Relates to Function 4:15
Layering: Simple or Stratified 5:26
Epithelial Cells: Apical & Basal Sides 7:06
Glandular Epithelial Tissue Forms Endocrine & Exocrine Glands 8:20
Review 9:16
Credits 9:54
***
Crash Course is on Patreon! You can support us directly by signing up at http://www.patreon.com/crashcourse
Want to find Crash Course elsewhere on the internet?
Facebook - http://www.facebook.com/YouTubeCrashCourse
Twitter - http://www.twitter.com/TheCrashCourse
Instagram - https://www.instagram.com/thecrashcourse/
CC Kids: http://www.youtube.com/crashcoursekids

Computed tomography (CT)-guided transthoracic needle biopsy is a well-established, minimally invasive diagnostic tool for pulmonary lesions. Few large studies have been conducted on the diagnostic performance and adequacy for molecular testing of transthoracic core needle biopsy (TCNB) for small pulmonary lesions.

How to perform a parotidectomy gland resection? In this video we take you step by step through the protid gland resection surgical technique. This video is intended for ENT residents and Head and Neck Surgery Surgeons. It is part of the ORL-Information's Head and Neck surgery Masterclass in collaboration with the University Hospital of Nîmes. Surgeons Editors: Pr. Benjamin LALLEMANT, MD, PhD - Dr. Camille GALY, MD Head and and Neck Department, University Hospital of Nîmes, France Official video | www.orl-information.fr
Cette vidéo présentent la technique de la parotidectomie avec dissection du nerf facial. Elle illustre les différents temps de l'intervention notamment le temps de repérage du nerf facial.
--------------------------------------
@Prévention médecine | Comment préserver sa santé ?
✔Abonnez-vous à la chaîne ORL-Information : https://www.youtube.com/c/ORLINFORMATION
✔Retrouvez-nous sur internet: https://www.orl-information.fr

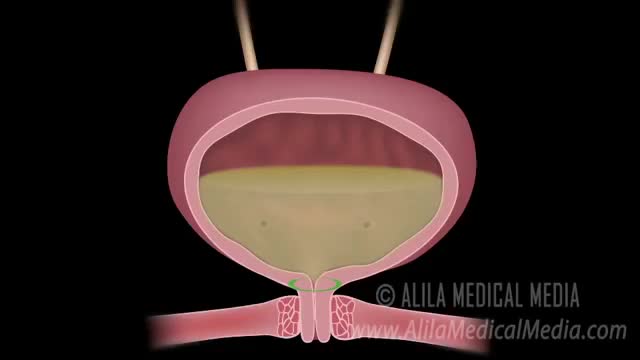
Vatche, Minassian, MD, MPH, Chief of Urogynecology, and Sarah Cohen, MD, MPH, Director of the Minimally Invasive Gynecologic Surgery Fellowship Program at Brigham and Women’s Hospital, perform a laparoscopic burch colposuspension, a procedure used to correct stress urinary incontinence.
Stress urinary incontinence is one of the most common types of incontinence and is characterized by urinary leakage during physical activities including coughing, sneezing, exercising, lifting, and laughing. As the condition progresses, it can become severe enough to happen with simple acts such as bending and walking. This condition is due to an anatomic weakness of the bladder neck which typically maintains the seal of urine during activity. Stress incontinence can result from a variety of conditions including vaginal childbirth, aging, menopause and obesity. As this is an anatomic condition, primary treatment may involve pelvic floor exercises and/or minimally invasive surgery.
Learn more about treatment for stress urinary incontinence:
Division of Urogynecology: http://www.brighamandwomens.or....g/Departments_and_Se
Division of Minimally Invasive Gynecologic Surgery: http://www.brighamandwomens.or....g/Departments_and_Se

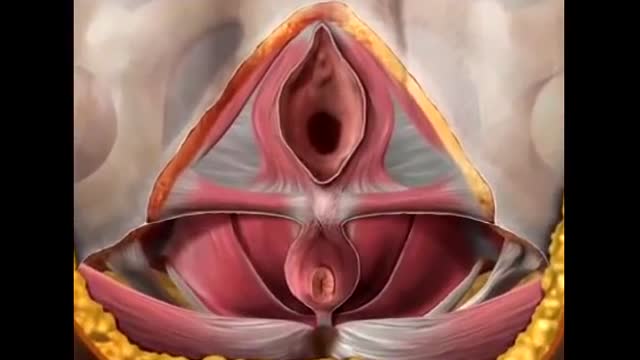
What factors should I consider when deciding whether to have surgery? The following factors should be considered when deciding whether to have surgery: Your age—If you have surgery at a young age, there is a chance that prolapse will recur and may possibly require additional treatment. If you have surgery at an older age, general health issues and any prior surgery may affect the type of surgery that you have. Your childbearing plans—Ideally, women who plan to have children (or more children) should postpone surgery until their families are complete to avoid the risk of prolapse happening again after corrective surgery. Health conditions—Any surgical procedure carries some risk, such as infection, bleeding, blood clots in the legs, and problems related to anesthesia. Surgery may carry more risks if you have a medical condition, such as diabetes, heart disease, or breathing problems, or if you smoke or are obese. New problems—Surgery also may cause new problems, such as pain during sex, pelvic pain, or urinary incontinence.
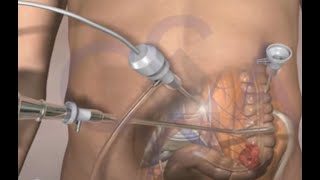
This surgical animation is for patient education and describes a laparoscopic colectomy, which is a type of minimally invasive surgery for colon cancer. Laparoscopic colectomy, also called minimally invasive colectomy, involves several small incisions in your abdomen. Instead of a big incision, the surgeon makes a few small cuts (0.5-1 centimeters) in the abdominal cavity to insert a surgical camera and instruments and perform the operation. A slightly bigger incision, about 3.5 centimeters wide, is made to remove the tumor.
When compared to traditional open surgery, laparoscopic colectomy can result in much less pain and swifter recovery. Depending on the procedure, most laparoscopic colectomy patients leave the hospital and return to normal activities more quickly than patients recovering from open surgery.
Colorectal cancer is the second leading cause of cancer death in the United States.
For more information about 3d animation videos, please visit https://www.amerra.com
Resection of sigmoid colostomy prolapse

Learn what's working for other Nursing Students! Check out our Top 10 Most Popular Lessons Here: https://bit.ly/3nda5u3
Central Line Dressing Change- Nursing Skills
FREE Nursing School Cheat Sheets at: http://www.NURSING.com
Get the full PPE Donning & Doffing lesson here:
https://nursing.com/lesson/cen....tral-line-dressing-c
Welcome to the NURSING Family, we call it the most supportive nursing cohort on the planet.
At NURSING.com, we want to help you remove the stress and overwhelm of nursing school so that you can focus on becoming an amazing nurse.
Check out our freebies and learn more at: (http://www.nursing.com)
Central Line Dressing Change - Nursing Skills:
In this video we’re going to talk about central line dressing changes. In this particular video, we’re going to look at a PICC Line, but the same strategy is also used for a Central Line. Remember the dressing should be changed every 7 days or as needed for peeling or soiling
This includes PICC lines. Sterile technique must be maintained to prevent Central-Line Associated Bloodstream Infections (CLABSI)
We love you guys! Go out and be your best selves today! And, as always, happy nursing!
Bookmarks:
0.05 Introduction
0.22 Mask application
0:36 Patient positioning
0:48 Dressing removal
1:20 Sterilization
1:26 Dressing change kit
2:14 Sterile gloves (Lesson link below)
https://nursing.com/lesson/ski....lls-01-04-sterile-gl
2:50 Cleaning the site
3:30 Bio patch application
4:20 Changing infusion caps
4:41 Labeling the dressing
5:00 Outro
Visit us at https://nursing.com/medical-disclaimer/ for disclaimer information.
NCLEX®, NCLEX-RN® are registered trademarks of the National Council of State Boards of Nursing, INC. and hold no affiliation with NURSING.com.
Macrobiopsy of breast lesions is a complicated procedure when performed with vacuum assisted biopsy tools. The Spirotome is a hand-held needle set that doesn’t need capital investment, is ready to use and provides tissue samples of high quality in substantial amounts. In this way quantitative molecular biology is possible with one tissue sample. The Coramate is an automated version of this direct and frontal technology
Sclerotherapy is a medical procedure used to eliminate varicose veins and veins. Sclerotherapy involves an injection of a solution (generally a salt solution) directly into the vein. The solution irritates the lining of the blood vessel, causing it to collapse and stick together and the blood to clot.
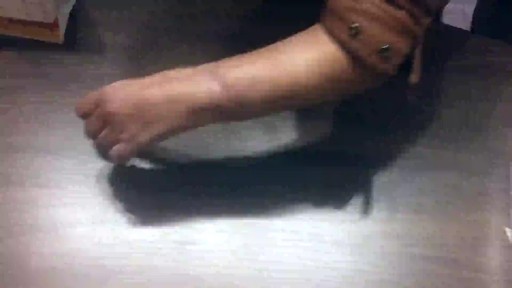
A 29 years old man lost his left wrist in car turn over in 2014. this video is taken 1 year after replantation. You can see another videos in my site: https://drliaghatclinic.com, https://instagram.com/liaghatclinic, https://t.me/liaghatclinic
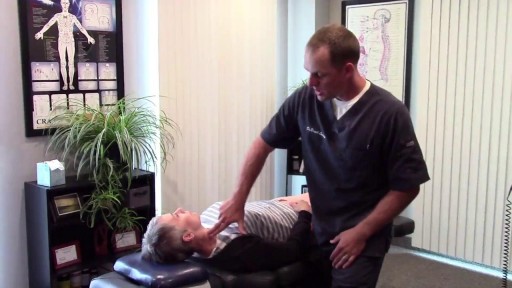
Wisdom teeth extractions can rear their ugly head later in life. This is a video of a patient with neck pain and neck weakness. When we stimulated the nerve fibers in the area of the extracted teeth there was an immediate improvement in her ability to control her neck muscles.
