- Physical Examination
- Surgical Examination
- Ophthalmology
- Clinical Skills
- Orthopedics
- Surgery Videos
- Laparoscopy
- Pediatrics
- Funny Videos
- Cardiothoracic Surgery
- Nursing Videos
- Plastic Surgery
- Otorhinolaryngology
- Histology and Histopathology
- Neurosurgery
- Dermatology
- Pediatric Surgery
- Urology
- Dentistry
- Oncology and Cancers
- Anatomy Videos
- Health and Fitness
- Radiology
- Anaesthesia
- Physical Therapy
- Pharmacology
- Interventional Radiology
- Cardiology
- Endocrinology
- Gynecology
- Emergency Medicine
- Psychiatry and Psychology
- Childbirth Videos
- General Medical Videos
- Nephrology
- Physiology
- Diet and Food Health
- Diabetes Mellitus
- Neurology
- Women Health
- Osteoporosis
- Gastroenterology
- Pulmonology
- Hematology
- Rheumatology
- Toxicology
- Nuclear Medicine
- Infectious Diseases
- Vascular Disease
- Reproductive Health
- Burns and Wound Healing
- Other
Top videos

Tonsillitis is inflammation of the tonsils, two oval-shaped pads of tissue at the back of the throat — one tonsil on each side. Signs and symptoms of tonsillitis include swollen tonsils, sore throat, difficulty swallowing and tender lymph nodes on the sides of the neck. Most cases of tonsillitis are caused by infection with a common virus, but bacterial infections also may cause tonsillitis. Because appropriate treatment for tonsillitis depends on the cause, it's important to get a prompt and accurate diagnosis. Surgery to remove tonsils, once a common procedure to treat tonsillitis, is usually performed only when bacterial tonsillitis occurs frequently, doesn't respond to other treatments or causes serious complications.

Lumpectomy means that a focal area of cancer is going to be removed. A lot of patients with a lumpectomy don’t need any specific breast reconstruction, explains Dr. Miguel Angel Medina, Director of Microsurgery with Miami Cancer Institute.
Al the end of surgical treatment, all those patients go on to need radiation therapy. For patients who have large breasts, physicians have to take a larger lumpectomy than normal.

Colorectal surgeon Conor Delaney, MD, explains laparoscopic surgery for colon cancer, including how it works and what patients can typically expect before, during, and after the procedure.
Learn more about colon cancer at http://cancer.org/coloncancer
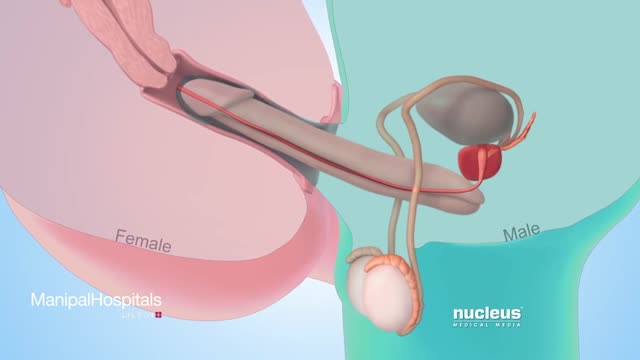
In some cases, the doctor will recommend that the couple seek assisted reproductive technologies (ART), such as IVF (in vitro fertilisation). ART do not cure or treat the cause of infertility but they can help couples achieve a pregnancy, even if the man's sperm count is very low.
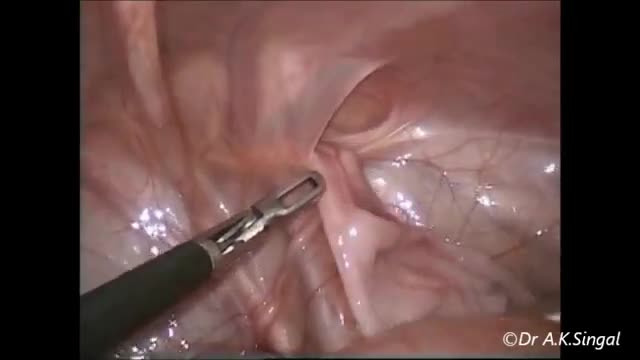
(cryptorchidism) is a testicle that hasn't moved into its proper position in the bag of skin hanging below the penis (scrotum) before birth. Usually just one testicle is affected, but about 10 percent of the time both testicles are undescended. An undescended testicle is uncommon in general, but common among baby boys born prematurely. The vast majority of the time, the undescended testicle moves into the proper position on its own, within the first few months of life. If your son has an undescended testicle that doesn't correct itself, surgery can relocate the testicle into the scrotum.

Visit our website to learn more about using Nucleus content for patient engagement and content marketing: http://www.nucleushealth.com/
#LaparoscopicColectomy #ColonSurgery #LargeIntestine
A colectomy is usually done to treat diseases that inflame your colon, a bowel obstruction, colon cancer, or a damaged or injured colon. The anatomy of the colon, and the laparoscopic procedure done to remove a portion of the colon, are depicted.
ANH18221

Headache is pain in any region of the head. Headaches may occur on one or both sides of the head, be isolated to a certain location, radiate across the head from one point, or have a viselike quality. A headache may appear as a sharp pain, a throbbing sensation or a dull ache. Headaches can develop gradually or suddenly, and may last from less than an hour to several days

Must Watch Very Special New Funny Video 2023 Doctor Funny Video Injection Wala Funny Video | Comedy Video Episode 124 By Fun Comedy Ltd
@funcomedyltd
#funcomedyltd
#doctor
#comedy
#wala
Hello Dear Viewers,
If We have any mistake. please comment and tell us, what is our mistake? We will try to solve this mistake next. please watch our videos and give us confidence to trying best. Thank you for watching this video.
IMPORTANT NOTE:-
This video are no any kind of risk. This video are totally acting no risk no Dangerous act no Physical Harm or Death its ok for viewers.
injection wala comedy video injection wala video injection funny video injection injection wala injection injection doctor doctor doctor sui wala wala suji wala suji wala cartoon doctor cartoon funny video tui tui injection cartoon 22 cartoon video injection video cartoon cartoon comedy video doctor video wala cartoon busy fun ltd my family our fun tv fun tv 24 fun tv 420 funny day funny family ding dong bidik fun tv roma fun tv
#cartoon
#comedyvideo
#doctor_doctor
#busyfunltd
#newfunnyvideo2022
#newfunniestcomedy
#injectionfunnyvideo
#sui_wala
#myfamily
#busyfunltd
#funnyday
#bidikfuntv
#mohafuntv
#dingdong

Addison's disease is a disorder that occurs when your body produces insufficient amounts of certain hormones produced by your adrenal glands. In Addison's disease, your adrenal glands produce too little cortisol and often insufficient levels of aldosterone as well. Also called adrenal insufficiency, Addison's disease occurs in all age groups and affects both sexes. Addison's disease can be life-threatening. Treatment for Addison's disease involves taking hormones to replace the insufficient amounts being made by your adrenal glands, in order to mimic the beneficial effects produced by your naturally made hormones.

Train with some of the region’s very best pediatric general surgeons — in a two-year, pediatric surgical fellowship training program at Nemours/Alfred I. duPont Hospital for Children. Our hospital’s Division of Pediatric Surgery is offering this program in affiliation with Sidney Kimmel Medical College at Thomas Jefferson University .
The goal of the fellowship is to give individuals who have completed an accredited general surgery residency advanced knowledge and training in the management and surgical treatment of newborns, infants and children.
Our Fellowship Program
This fellowship will help you prepare for certification by the American Board of Surgery, and is accredited by the Accreditation Council for Graduate Medical Education (ACGME).
The Pediatric Surgery Fellowship aims to:
train a well-rounded, empathetic, safe pediatric surgeon who is confident managing all aspects of the surgical care of children.
steward our fellow in quality improvement projects and methodology, and provide research opportunities.
provide a rigorous didactic curriculum for our fellow utilizing 360 degree feedback.
cultivate opportunities for our fellow to educate residents and students.
encourage our fellow to collaborate across specialties.
develop our fellow’s presentation skills during M&M conferences and multi-disciplinary educational meetings.
The program features the full participation of all nine of the pediatric surgical division’s full-time faculty members. Each of these physicians will contribute greatly to your education. Your training will include operating room and outpatient clinic experience, as well as bedside evaluation of children. You’ll also play a role in the organization of formal teaching conferences, held weekly. Formal rotations will be spent on Pediatric Urology, PICU and Neonatology during the first 12 months. The last year will be spent entirely on the Pediatric Surgical Service.
The majority of your inpatient consultative time will take place at Nemours/Alfred I. duPont Hospital for Children, a freestanding children’s hospital in Wilmington, Del. The hospital:
is nationally ranked by U.S. News & World Report in eight pediatric specialties
recently opened expansion with 260 beds
performs more than 2,800 inpatient and 9,300 outpatient surgical procedures each year in our operating rooms
has an on-site delivery center for newborns with complex congenital anomalies
receives more than 50,000 annual visits in our Emergency Department (ED)
is accredited by The American College of Surgeons as a Level One Pediatric Trauma Center
is accredited by the Commission on Accreditation of Rehabilitation Facilities (CARF)
Visit https://www.nemours.org/educat....ion/gme/fellowships/ to learn more.
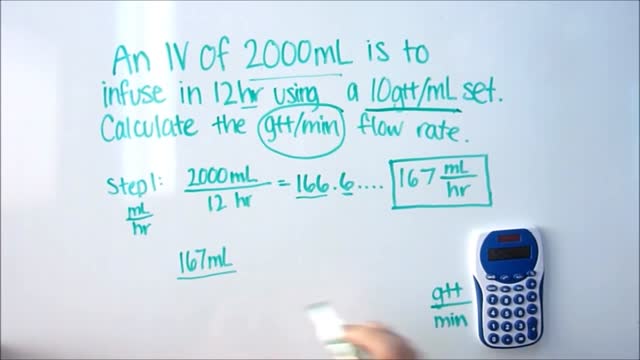
IV Dose Calculations
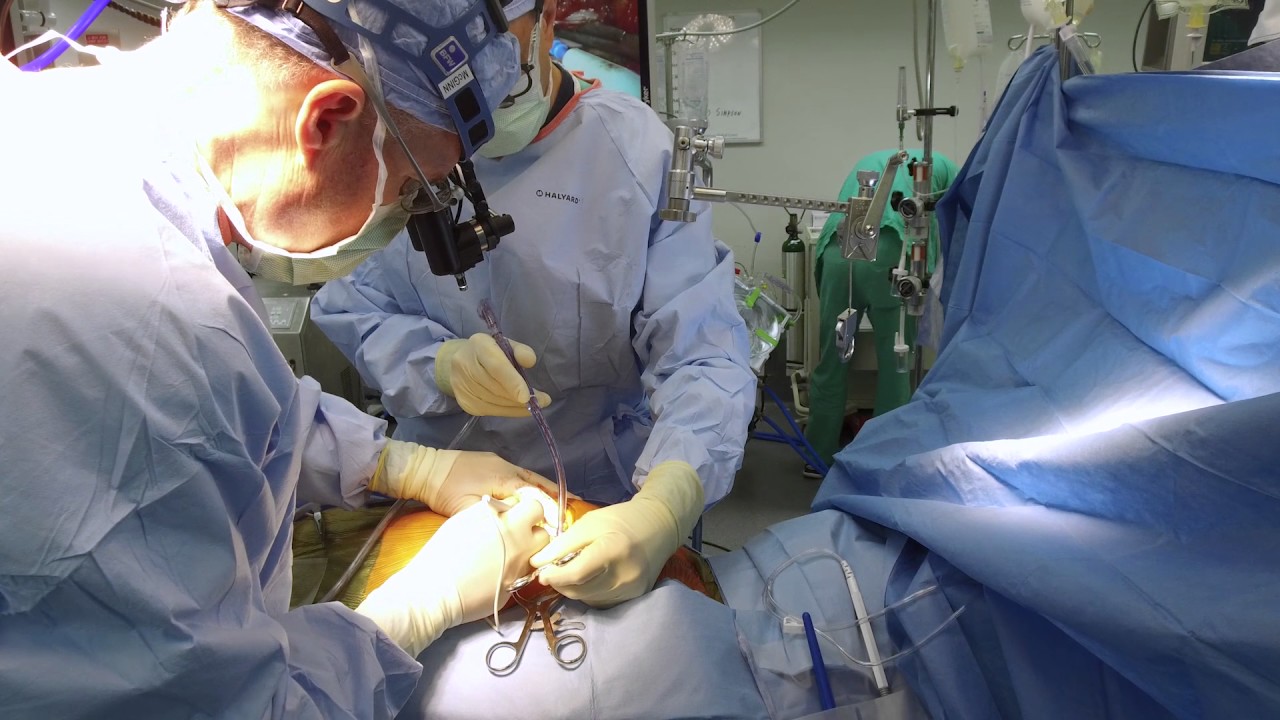
Dr. Joseph McGinn explains minimally invasive bypass, the procedure he pioneered as an alternative to open heart surgery.

You can now test your knowledge with a free lesson quiz on NURSING.com!
Click here for your free quiz: https://bit.ly/3HwJr8t
Stoma Care- Changing a Colostomy Bag (Nursing Skills)
FREE Nursing School Cheat Sheets at: http://www.NURSING.com
Get the full lesson on Stoma Care here:
05.01 Stoma Care (Colostomy bag) | NURSING.com
Check out our new Nurse Care Plan Lessons here:
https://bit.ly/3BPRfPL
Watch the Nursing Skills Course Introduction here:
https://nursing.com/lesson/ski....lls-00-01-course-int
Get Access to Thousands of Lessons here:
https://nursing.com/courses/
Welcome to the NURSING Family, we call it the most supportive nursing cohort on the planet.
At NURSING.com, we want to help you remove the stress and overwhelm of nursing school so that you can focus on becoming an amazing nurse.
Check out our freebies and learn more at: (http://www.nursing.com)
Stoma Care- Changing a Colostomy Bag (Nursing Skills)
In this video, we’re going to talk about stoma care. Now, the wafer and bag for an ostomy only NEEDS to be changed every 3 days, or if it’s leaking. But, you still need to be able to assess the stoma itself. In this case we’re going to show you how to replace the bag and clean and assess the stoma. Start by putting a towel under the patient on the side of the stoma. We love you guys! Go out and be your best selves today! And, as always, happy nursing!
Bookmarks:
0.05 Introduction to Stoma Care
0:20 Assessing the stoma
0:47 Cleaning the stoma
1:12 Inspecting the stoma
1:25 Measuring and cutting the stoma
2:00 Applying and sealing the bag
2:35 Documentation
2:41 Outro
Visit us at https://nursing.com/medical-disclaimer/ for disclaimer information.
NCLEX®, NCLEX-RN® are registered trademarks of the National Council of State Boards of Nursing, INC. and hold no affiliation with NURSING.com.
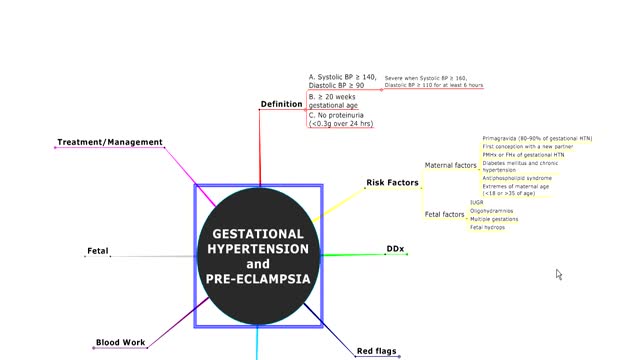
Gestational hypertension, also referred to as pregnancy induced hypertension (PIH) is a condition characterized by high blood pressure during pregnancy. Gestational hypertension can lead to a serious condition called preeclampsia, also referred to as toxemia. Hypertension during pregnancy affects about 6-8% of pregnant women.
Ellis demonstrates how to insert and then remove an NG tube. This includes drawing gastric residual and checking the pH. After the demonstration, Ellis provides additional tips about clamping the NG tube and using the blue pigtail.
Our Critical Nursing Skills video tutorial series is taught by Ellis Parker MSN, RN-BC, CNE, CHS and intended to help RN and PN nursing students study for your nursing school exams, including the ATI, HESI and NCLEX.
#NCLEX #HESI #Kaplan #ATI #NursingSchool #NursingStudent #Nurse #RN #PN #Education #LVN #LPN #ClinicalSkills #NGTube #nurseeducator
00:00 What to expect
00:30 Preparing NG tube patient
00:56 Preparing NG tube equipment
1:29 Measuring the NG tube
2:02 Preparing for NG tube insertion
2:28 Inserting the NG tube
3:17 Checking placement with pH
4:23 Anchoring with split-tape
5:32 Connecting to suction
6:05 Disconnecting from suction
6:17 What to do before removal?
7:03 Removing NG tube
7:40 Additional tips on clamping
8:31 The blue pigtail
🚨 Reminder: shipping deadlines are looming 👀
🎁 Regular Shipping: Order by Friday, December 15
🚀 Expedited Shipping: Order by Monday, December 18
🔍 Still searching for last-minute gifts? Consider a Level Up RN Gift Card! 💌 It’s not only a thoughtful present but also the perfect way to share treasures like Pharmacology Flashcards OR digital treasures like Flashables Digital Nursing Flashcards & the Level Up RN membership. Give the gift of knowledge this holiday season! 🧠⚡️💖 bit.ly/LevelUpRNGC
🚪 Access our Cram Courses, Quizzes and Videos all in one ad free space with Level Up RN Membership https://bit.ly/LevelUpRNMembership
Want more ways to MASTER Clinical Skills? Check out our flashcards & videos!
👇👇👇👇👇👇👇👇👇👇
👉 https://bit.ly/clinicalnursingskills 👈
☝️👆☝️👆☝️👆☝️👆☝️👆
This is your one-stop-shop for materials to help you LEARN & REVIEW so you can PASS Nursing School.
🤔🤔🤔 DO YOU WANT TO PASS your classes, proctored exams and the NCLEX? 🤔🤔🤔 Our resources are the best you can buy. They are built with a single goal: help you pass with no fluff. Everything you need, and nothing you don’t. Don’t take our word for it, though! Check out our hundreds of ⭐️⭐️⭐️⭐️⭐️ reviews from nurses who passed their exams and the NCLEX with Level Up RN.
🗂️ Our Ultimate Nursing School Survival kit is your number 1 resource to get through nursing school and to pass the NCLEX. Whether you're just starting school or you’re already prepping for the NCLEX, this bundle of flashcards is the best you can buy. It covers all the information you need to know to pass all your exams and it has FREE shipping!
➡️ https://bit.ly/TUNSSK ⬅️
L👀king for EVEN MORE resources to survive Nursing School? Make your Nursing School experience your own! Life’s difficult enough—learning shouldn’t be.
🪅 Games https://nursesquad.com
💻 Digital resources https://bit.ly/NursingStudyCourses
📅 Organizational tools https://bit.ly/OrganizingSchool
✨Want perks? Join our channel!
https://youtube.com/leveluprn/join
🏷 Head to https://leveluprn.com/specials for all our latest deals!🥳️
📧 LOOKING FOR FREE RESOURCES TO HELP WITH YOUR EXAMS? Get exclusive tips, latest video releases and more delivered to your email!
➡️ https://leveluprn.com/signup ⬅️
⚕ 👩 LEVEL UP NURSE SQUAD 👩⚕️
All of the nurses at Level Up RN are here to help! Cathy Parkes started helping her fellow classmates back when she was in nursing school, tutoring so they could pass their exams and graduate. After she got her BSN and started working as an RN at Scripps Encinitas Hospital, she started this YouTube channel to help nursing students around the world. Since then she has built a team of top-notch dedicated nurses and nurse educators who are focused on improving nursing education and supporting career advancement for nurses everywhere. With flashcards, videos, courses, organizational tools and more, we are singularly focused on helping students and nurses Level Up on their exams and nursing careers.
FREE Nursing School Cheat Sheets at: http://www.NURSING.com
Get the full lesson on IM Injections here:
https://nursing.com/lesson/ski....lls-06-01-pill-crush
Check out our new Nurse Care Plan Lessons here:
https://bit.ly/3BPRfPL
Get Access to Thousands of Lessons here:
https://nursing.com/courses/
Welcome to the NURSING Family, we call it the most supportive nursing cohort on the planet.
At NURSING.com, we want to help you remove the stress and overwhelm of nursing school so that you can focus on becoming an amazing nurse.
Check out our freebies and learn more at: (http://www.nursing.com)
Intramuscular Injection Techniques (Nursing Skills)
In this video, we’re going to look at proper administration techniques for intramuscular medication administration. Of course, always follow your 5 rights and calculate the correct volume for administration. We love you guys! Go out and be your best selves today! And, as always, happy nursing!
Bookmarks:
0.05 Introduction to Intramuscular injections
0.16 site and needle selection
0.35 site sterilization
0.43 Z track method
0.58 needle insertion
1.10 medication injection
1.14 needle removal
1.25 bandaging and needle disposal
1.30 documentation and patient monitoring
1.35 Outro
Visit us at https://nursing.com/medical-disclaimer/ for disclaimer information.
NCLEX®, NCLEX-RN® are registered trademarks of the National Council of State Boards of Nursing, INC. and hold no affiliation with NURSING.com.

► Get a free NCLEX NGN sample test today: http://lectur.io/nclexrnsampletestyt
► Create your free account today: http://lectur.io/nurseregisteryt
► If you’re an nursing educator or faculty member, visit: http://lectur.io/nursytb2u
In this video “How To Do An IM (Intramuscular) Injection” you will learn about:
►the steps in the administration of intramuscular medications
►the angle to position the syringe while administering an intramuscular injection
►the landmark to administer an intramuscular injection in the deltoid muscle
►5 tips for the safe administration of an intramuscular medication
►the steps of the Z-track method for intramuscular injections
►the role of aspirating blood during an intramuscular injection and evaluate whether this practice is currently in use
► This video is part of the Lecturio course “Fundamentals of Nursing: Clinical Skills”
► WATCH the complete course on http://lectur.io/njection
► THE PROF: Samantha Rhea MSN, RN has been a nurse since 2008 and a nursing faculty teacher since 2012. She has been recognized for clinical excellence as an interventional cardiology nurse and also led a Joint Commission Accredited Stroke Center. Ms. Rhea is an award-winning expert in clinical teaching and continues to maintain a current clinical practice and teaches at a University nursing program.
► LECTURIO is your smart tutor for nursing school: Learn the toughest NCLEX® topics with high-yield video lectures, integrated quiz questions, and more. Register now to study anytime and anywhere you want to: https://nursing.lecturio.com/#/
► CHECK OUT ALL NURSING COURSES:
Leadership Nursing: http://lectur.io/leadershipnursing
Dosage Calculation Nursing: http://lectur.io/dosagecalcnursing
Physiology Nursing: http://lectur.io/physiologynursing
Medical Surgical Nursing: http://lectur.io/medsurgnursing
Pharmacology Nursing: http://lectur.io/pharmacologynursing
NCLEX® Pharmacology Nursing: http://lectur.io/pharmnclexnursing
Pediatric Nursing: http://lectur.io/pediatricnursing
Study Skills Nursing: http://lectur.io/studyskillsnursing
Fundamentals of Nursing - Theory: http://lectur.io/fundamentalstheory
Fundamentals of Nursing - Clinical Skills: http://lectur.io/fundamentalsclinicalskills
Nursing Prerequisites: http://lectur.io/nursingprerequisites
Mental Health Nursing: http://lectur.io/mentalhealthnursing
Maternal-Newborn Nursing: http://lectur.io/maternalnewbornnursing
► INSTALL the free Lecturio app
iTunes Store: https://app.adjust.com/z21zrf
Play Store: https://app.adjust.com/b01fak
► SUBSCRIBE to our YouTube channel: http://lectur.io/subscribenursing
► WATCH MORE ON YOUTUBE: http://lectur.io/nursingplaylists
► LET’S CONNECT:
Facebook: www.facebook.com/lecturio.nursing
Instagram: www.instagram.com/lecturio_nursing
Join Discord Community: https://discord.gg/Ue95WDxCrp
TikTok: www.tiktok.com/@lecturio_nursing
LinkedIn: https://www.linkedin.com/company/lecturio-medical/
#nursingschool #nursingeducation #nursingclinicalskills #leadershipnursing #nclex #nursingfundamentals #nursingclinical #nursingskills

Health Assessment: Musculoskeletal System- Nursing Skills
FREE Nursing School Cheat Sheets at: http://www.NURSING.com
Get the full lesson on musculoskeletal assessment here:
https://nursing.com/lesson/02-11-musculoskeletal/
Welcome to the NURSING Family, we call it the most supportive nursing cohort on the planet.
At NURSING.com, we want to help you remove the stress and overwhelm of nursing school so that you can focus on becoming an amazing nurse.
Check out our freebies and learn more at: (http://www.nursing.com)
Health Assessment: Musculoskeletal System- Nursing Skills:
In this video we’re going to review a Musculoskeletal Assessment. The Musculoskeletal system involves the muscles, bones, and joints. This means we must assess structure AND function! If the patient cannot stand, assessments should be performed in the bed to the best of your ability. If they cannot perform Active Range of Motion (ROM), use Passive movements to determine ROM.
We love you guys! Go out and be your best selves today! And, as always, happy nursing!
Bookmarks:
0.05 Introduction
0:34 Spine assessment
1:02 Range of motion
1:39 Extremity assessment
1:52 Shoulder range of motion
2:10 Elbow & wrist range of motion
2:25 Hand range of motion
2:34 Upper extremity strength
2:54 Lower extremity range of motion
3:02 Hips range of motion
3:20 Knees range of motion
3:30 Ankles range of motion
3:38 Toes range of motion
3:42 Lower extremity strength
4:05 Outro
Visit us at https://nursing.com/medical-disclaimer/ for disclaimer information.
NCLEX®, NCLEX-RN® are registered trademarks of the National Council of State Boards of Nursing, INC. and hold no affiliation with NURSING.com.

►Pass your CNA Exam on Your First Try - https://bit.ly/3ulqCz1
This is the Basic Nursing Skills Exam. There are 70 questions that will help you prepare for the 2023 CNA examination. The questions in this practice test are based on the category, Basic Nursing Skills, that is included in the exam. They are similar to the actual questions that you will be asked. Some of the topics covered in this practice test include:
Care for residents with a specific diagnosis, such as Congestive Heart Failure
Interpreting medical abbreviations and acronyms
CNA responsibilities: vital signs and intake & output
Medical abbreviations and terms
Common patient scenarios

Today, the most common approach for open-heart surgery is a sternotomy, which requires a 12-14-inch incision through the breastbone. But in the hands of experienced minimally invasive surgeons, many cardiac procedures can be performed through smaller 2- to 3-inch incisions between the ribs without the need to cut through the breastbone. Learn more in this medical animation from Sarasota Memorial's Minimally Invasive Cardiac Surgery Team and medical director Jonathan Hoffberger, DO. For information or referrals, visit smhheart.com.
