- Physical Examination
- Surgical Examination
- Ophthalmology
- Clinical Skills
- Orthopedics
- Surgery Videos
- Laparoscopy
- Pediatrics
- Funny Videos
- Cardiothoracic Surgery
- Nursing Videos
- Plastic Surgery
- Otorhinolaryngology
- Histology and Histopathology
- Neurosurgery
- Dermatology
- Pediatric Surgery
- Urology
- Dentistry
- Oncology and Cancers
- Anatomy Videos
- Health and Fitness
- Radiology
- Anaesthesia
- Physical Therapy
- Pharmacology
- Interventional Radiology
- Cardiology
- Endocrinology
- Gynecology
- Emergency Medicine
- Psychiatry and Psychology
- Childbirth Videos
- General Medical Videos
- Nephrology
- Physiology
- Diet and Food Health
- Diabetes Mellitus
- Neurology
- Women Health
- Osteoporosis
- Gastroenterology
- Pulmonology
- Hematology
- Rheumatology
- Toxicology
- Nuclear Medicine
- Infectious Diseases
- Vascular Disease
- Reproductive Health
- Burns and Wound Healing
- Other
Top videos

Shave Your Pubic Hair

Acute respiratory distress syndrome (ARDS) occurs when fluid builds up in the tiny, elastic air sacs (alveoli) in your lungs. More fluid in your lungs means less oxygen can reach your bloodstream. This deprives your organs of the oxygen they need to function. ARDS typically occurs in people who are already critically ill or who have significant injuries. Severe shortness of breath — the main symptom of ARDS — usually develops within a few hours to a few days after the original disease or trauma. Many people who develop ARDS don't survive. The risk of death increases with age and severity of illness. Of the people who do survive ARDS, some recover completely while others experience lasting damage to their lungs.

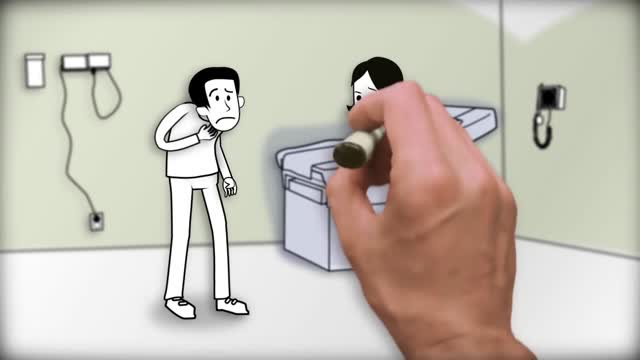
Vertigo is a sensation of spinning. If you have these dizzy spells, you might feel like you are spinning or that the world around you is spinning. Causes of Vertigo Vertigo is often caused by an inner ear problem. Some of the most common causes include: BPPV. These initials stand for benign paroxysmal positional vertigo. BPPV occurs when tiny calcium particles (canaliths) clump up in canals of the inner ear. The inner ear sends signals to the brain about head and body movements relative to gravity. It helps you keep your balance. BPPV can occur for no known reason and may be associated with age. Meniere's disease. This is an inner ear disorder thought to be caused by a buildup of fluid and changing pressure in the ear. It can cause episodes of vertigo along with ringing in the ears (tinnitus) and hearing loss. Vestibular neuritis or labyrinthitis. This is an inner ear problem usually related to infection (usually viral). The infection causes inflammation in the inner ear around nerves that are important for helping the body sense balance

AUTO-HEMOTHERAPY IN HERPES CASES. THE STORY OF A DOCTOR IN FERME-NEUVE. CBC NEWS 1977

A subdural hematoma is a collection of blood outside the brain. Subdural hematomas are usually caused by severe head injuries. The bleeding and increased pressure on the brain from a subdural hematoma can be life-threatening.
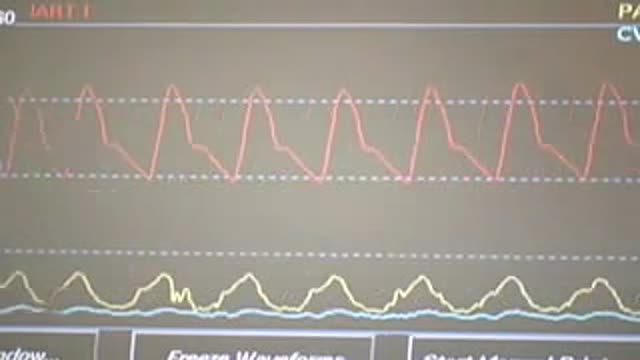
Central Venous Catheter Placement & Pulmonary Artery Catheter Video

Treatment may include: Rest. Ice or heat. Nonsteroidal anti-inflammatory medications. Strengthening exercises. Ultrasound therapy. Corticosteroid injection. Surgery (for severe injuries)
The Valsalva Maneuver is any attempt to exhale with the mouth and nose closed. Named after the Italian physician and anatomist, Antonio Maria Valsalva (1666-1723), it is also known as Valsalva's Test and Valsalva's Method.

Over one million Americans have the sexually transmitted virus, HIV, which can lead to the deadly disease known as AIDS.
HIV can be transmitted in the sexual fluids, blood or breast milk of an infected person. HIV prevention therefore involves a wide range of activities including prevention of mother-to-child transmission, needle exchanges and harm reduction for injecting drug users, and precautions for health care workers.
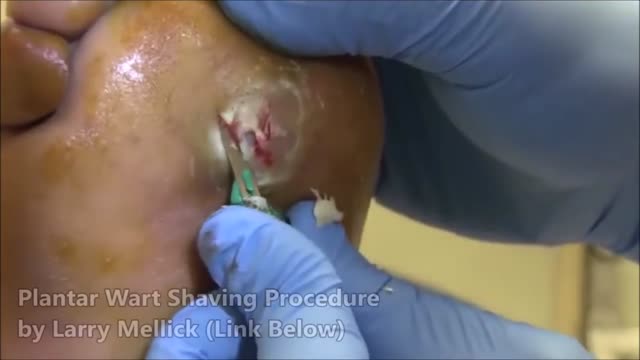
Plantar warts are hard, grainy growths that usually appear on the heels or balls of your feet, areas that feel the most pressure. This pressure also may cause plantar warts to grow inward beneath a hard, thick layer of skin (callus). Plantar warts are caused by the human papillomavirus (HPV). The virus enters your body through tiny cuts, breaks or other weak spots on the bottom of your feet. Most plantar warts aren't a serious health concern and may not require treatment. But plantar warts can cause discomfort or pain. If self-care treatments for plantar warts don't work, you may want to see your doctor to have them removed.

Cancer starts when cells in a part of the body begins to grow out of control and can spread to other areas of the body. There are many kinds of cancer. Cells in nearly any part of the body can become cancer. To learn more about how cancers start and spread, see What Is Cancer? Leukemias are cancers that start in cells that would normally develop into different types of blood cells. Here we will talk about acute myeloid leukemia (AML). Acute myeloid leukemia (AML) has many other names, including acute myelocytic leukemia, acute myelogenous leukemia, acute granulocytic leukemia, and acute non-lymphocytic leukemia. “Acute” means that this leukemia can progress quickly if not treated, and would probably be fatal in a few months. “Myeloid” refers to the type of cell this leukemia starts from. Most cases of AML develop from cells that would turn into white blood cells (other than lymphocytes), but some cases of AML develop in other types of blood-forming cells. The different types of AML are listed in “ How is acute myeloid leukemia classified?” AML starts in the bone marrow (the soft inner part of certain bones, where new blood cells are made), but in most cases it quickly moves into the blood. It can sometimes spread to other parts of the body including the lymph nodes, liver, spleen, central nervous system (brain and spinal cord), and testicles. Other types of cancer can start in these organs and then spread to the bone marrow. But these cancers that start elsewhere and then spread to the bone marrow are not leukemias. Normal bone marrow, blood, and lymphoid tissue To understand the different types of leukemia, it helps to know about the blood and lymph systems.
Ankylosing spondylitis is an inflammatory disease that, over time, can cause some of the vertebrae in your spine to fuse. This fusing makes the spine less flexible and can result in a hunched-forward posture. If ribs are affected, it can be difficult to breathe deeply. Ankylosing spondylitis affects men more often than women. Signs and symptoms typically begin in early adulthood. Inflammation also can occur in other parts of your body — most commonly, your eyes. There is no cure for ankylosing spondylitis, but treatments can lessen your symptoms and possibly slow progression of the disease.

This 3D medical animation provides a general overview of asthma, the clinical condition of the upper respiratory airways.
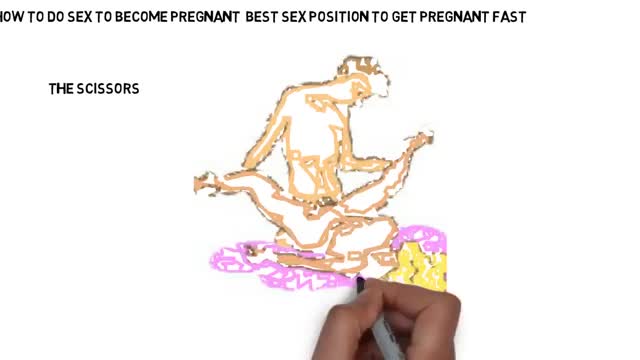
Best Sex Position to Get Pregnant Fast

Histology of Tooth Development

Davinci Robotic Prostatectomy Animation

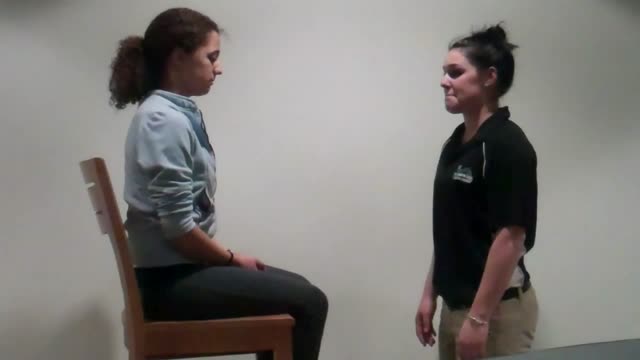
Exam- COPD Patient

this video shows how the child circumcision is easy and safe with alisklamp
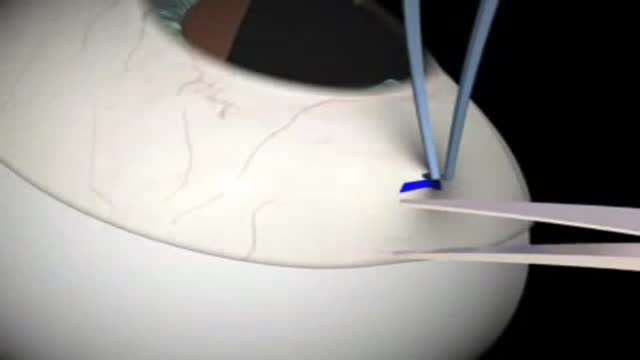
Glaucoma Surgery 3D Animation
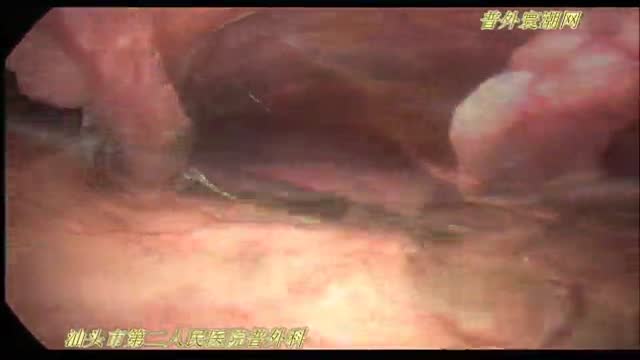
腹腔镜十二指肠球部溃疡穿孔修补术
